If you want a closer look at the pictures/labels, click on the picture and it will open up larger for you.
Lifelines are a "marker" that you put into your knitting that runs across a row to prevent the stitches from further unraveling if they are dropped. Many people use lifelines in different ways, and they show up mostly in lace knitting.
For a life line you will need thread or yarn (to be discussed in detail momentarily), a small crochet hook or a blunt needle, scissors, and your project. I have these laid out in the below picture with my project with two current lifelines in place. There is an arrow pointing to one but it can be hard to make out the white thread against the pastel colors of my yarn.
 You will want to choose a material for your thread that is not going to damage your yarn in the case of friction as you will be stretching the stitches that the yarn sits across as you look at your project and in most cases you want to use a material that is thinner that your working yarn. Many people swear by unwaxed dental floss.
To have enough room to stretch out my project, I cut my thread to two and a half times the width of the project:

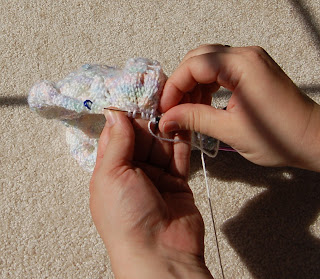
You can then use the crochet hook or the blunt needle to run the thread through the stitches.
Crochet hook:
 Blunt needle:
Be careful to not thread the lifeline through the stitch markers (unlike above crochet hook placement picture) unless you would like to keep the marker in that area.

You can then secure you lifelines in with a slipknot in the below manner:
 To help them from coming out before you choose to take them out. You can also leave the ends hanging or tie the ends together, whatever way is more comfortable for you.
Now you can continue knitting.
If you've had a little bit of difficulty seeing my lifeline, this picture may help as I have a black box in the area of one of the two lifelines in at this point of the project. I will get black thread for my next lifeline and take a picture of that for future reference.

The frequency as to placement of lifelines and how many are ultimately up to you and your comfort level. When I put out a request on the Knitters Review Forums the answers were as varied as is everything else is in knitting.
Some of the best suggestions as to placement were:
1. At the begining of a lace repeat.
2. At a row before major shaping.
3. At any point where you have had a previous issue.
In the case of designing suggestions for placement also included:
1. Anywhere you have determined you like.
2. When you've completed all the work you can for the day.
As to how long to leave them in suggestions included:
1. Keep two lifelines in lace at all times, each at the beginning of pattern repeats reusing the same two threads.
2. When you are comfortable with the work that you've done and are ready to reuse the string at the next lifeline point.
For myself (and that is Convertible that the pictures are from) I'm keeping two active lifelines in the work just because I am so bad at deciding to frog things because of mistakes and am pulling the bottom one to place whenever I have finished all 12 rows in one pattern repeat. As it was I frogged and had to recast on on the first day of the project because I chose not to place a lifeline when I completed my garter stitch border before moving on to the pattern and lost a stitch while doing that. I would have just been able to recover the stitch and keep moving if I had placed the lifeline.
Hope this helps!
I thank everyone who has posted so far on their personal projects and am enjoying see the progress. You are all doing beautifully and I can't wait to see the projects completed.
As always, let me know if there is anything I can do to help you and I am open to suggestions for tutorials and for future KAL projects.
Happy knitting.


1 comment:
Thank you for this tutorial! I'm knitting my first lace market bag and am so scared to mess up because I know I'll have to start over! I knew there had to be a better way and a lifeline is it! Great explanation! Pardon me, now, as I go look for some dental floss...
Post a Comment